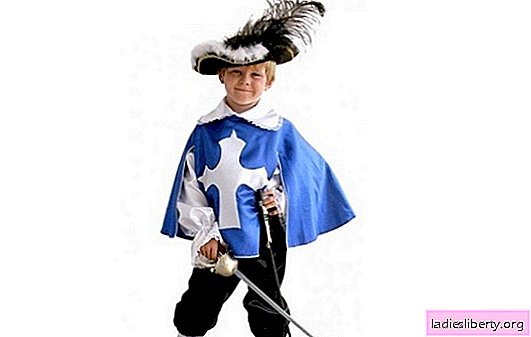
A distinctive feature of this musketeer costume is the presence of a special cape, hat and sword. Doing it yourself is easy even for the most inexperienced seamstress..
DIY Musketeer Costume for Boy: Cape
In order to sew a wrap, you will need the following materials: a fabric of two colors (it is better if it will be an atlas), lace or a wide satin ribbon. The width of the satin ribbon should be at least 4 cm, and the length should be at least 5 meters, since a small length for the hat will be required. According to the color scheme, the material should be blue or blue, and be combined in this range of shades. So, for example, the cloak will be blue, and the cross on it and the pants are blue. In this case, the edging and collar should be made of white or light blue fabric.
The cross here is an ornament - a symbol of the order of the musketeers, it can be made of white fabric. Another beautiful combination of colors can be a dark blue cloak, a white cross, a white collar and a white lace trim around the edge of the entire cloak.
Stage 1
Take measurements from your boy. For sewing you need to know the following values: the height of the product (the distance from the shoulder to the lowest point of the cape), the circumference of the collar and arm length. Since the shoulder will not be marked on the cape, the measure of the arm’s length here will be the distance from the collar to the elbow or the middle of the forearm.
Stage 2
Spread a piece of blue or blue fabric on a flat surface to cut the cloak. Transfer the dimensions to it and draw the outline of the pattern.
For choice, there are two options for a cloak with a cross and one option for a cloak-cloak.
Option 1:

Option 2:

Option 3:

The third option, if desired, can be freely combined with the second option. This will be a convenient composition, as the second version of the cape does not provide sleeves.
Stage 3
Cut out the shape of the cape from the fabric that you have chosen to sew your suit. Separately from white fabric or a lighter tone than the cape itself, the collar and cross are cut.
Stage 4
At this stage, the edging of the cape is sewn, which will be made of either light lace or satin ribbon.
If your choice fell on lace, then tuck and stitch the cut edge around the perimeter of the entire part. Since the fabric is satin, it is better to make a double collar.
If you have good sewing skills, you can simultaneously tuck the fabric and lay the lace. And if in doubt about your abilities, then first tuck and stitch the fabric, and stitch the lace over the first seam over the first. In this case, the edge of the lace, which is attached to the fabric, hides behind the fabric, and not vice versa.
If a satin ribbon is used as a fringing, then the edge of the fabric is not necessary to twist. The tape simply goes around the cut edge on both sides and is attached along the entire perimeter of the cape.
Stage 5
Just as the cape was sheathed, sheathe the collar too. Sew the collar to the neck of the cape. To do this, unscrew the cape and lay it face down on a flat surface. From the top, place the collar part also face down. Align the neckline of the collar and the cape and sew it around the entire circumference, departing from the edge no more than 1 cm.
Turn the cloak to the front side and through the neck take the collar to the fore. Spread it and iron it so that there are no creases on the fabric.
Stage 6
A cross is sewn to the center of the front of the cloak. To do this, tuck the edges of the cross and sketch it by hand. See if the cross is even, and only then attach it on the sewing machine, stepping back from the edge less than 0.5 cm.
Before you start to bast, for splendor, decorations around the entire perimeter of the cross between the fabrics, you can lay lace. It will make the image larger. And if you lay the lace in even folds and sew it, it will be the peak of skill and very beautiful.
Do-it-yourself musketeer costume for a boy: pants
For this suit, both trousers and breeches are suitable. We call it all in one word "pants", and you will choose their length for your suit yourself. They can be either brown or black, or blue.
Sewing will require not only fabric, but also a wide elastic band.
Stage 1
To get started, take measurements from the child. You need to find out the length of the pants (the distance from the belt to the bottom of the pants), hip and leg circumference.
Stage 2
Transfer the dimensions to the fabric and draw a pattern. The easiest option is great for breeches.

You can offer just such a pattern of medium complexity.

Stage 3
Cut and sew parts together. Insert the elastic into the belt. If desired, the elastic can be inserted into both legs above the cut edge and then you will get a magnificent bottom of the pants, or along the edge itself, in this version they will taper to the bottom, as shown in the picture below.

Do-it-yourself musketeer costume for a boy: hat
For a navy blue cloak with a blue cross on the chest, you can make either a dark blue hat or a blue hat in combination with the color of the cross. Also, the color of the hat can be in the same color scheme with black or brown pants.
The hat can be made of cardboard, and then pasted with a suede or satin fabric.
Stage 1
Cut out cardboard details: margins, tulle or height and bottom of the hat. Tulia width 10-15 cm. Plus 4 cm for hem.

Stage 2
Fold the top 2 cm along the top and bottom and cover the tucked edges with glue. Make cuts on the long side from the cut edge to the gateway. Connect the opposite narrow edges of the tulle and twist it into a circle or tube and fix them with glue or a stapler. It is necessary that she remains in this position and does not unfold.
Stage 3
Glue the bottom of the hat and field to the top. Wait for the glue to dry.
Stage 4
At this stage, the hat can be decorated with fabric, belt and feather.
Cut out exactly the same parts from the fabric that the cardboard hat was made of. Only details from the fabric should be more, since it is desirable to glue not only the outer, but also the inner side of the hat. Coat the cardboard structure with glue and glue it with a cloth.
Wait for the glue to dry completely.
Stage 5
Along the outer edge of the fields, lay a border in the form of a strip of satin ribbon. Fold the ribbon in half along the entire length and glue it with a bend on the lower and upper sides of the hat fields.
Wrap the bottom of the body with a wide satin ribbon. Slip under it and glue the feather. It is better if the feather is natural magnificent, but it can also be made of paper.
Cut the shape of a pen on a white sheet of paper and make frequent cuts from edge to center along the entire length. You can do the same with two or three sheets of paper, and then glue them in the center along the entire length. In this embodiment, the pen will turn out to be two to three times more magnificent than if it were from only one layer of paper.
Do-it-yourself musketeer costume for a boy: sword


In order to make a sword you will need cardboard, scissors, a marker and foil.
Stage 1
Cut out a guard, a handle and a blade from cardboard. For a blade, cardboard is cut in the shape of an elongated rectangle. For a pen, cardboard is cut out in the shape of a small rectangle of 6 x 15 cm.
Stage 2
Twist the blade part into the tube. A part cut for the handle bends around a tube in the shape of a blade from a cardboard from the bottom wide edge. All this is inserted into the hole of the guard.
Stage 3
Make a drawing in the form of patterns on the guard.
For greater realism, if you wish, you can wrap the blade with foil. So it will be more like a metal product. Even if you leave the blade in a non-wrapped version, the sword will still look like a sword.