In life, a situation often occurs when a very necessary item is not at hand and it is magically lost in the home jungle with things.
The solution to this problem will be the purchase of a housekeeper.
In a practical way, this element of decor is not difficult to make with your own hands.
Do-it-yourself simple open housekeepers
Such key holders are easy to integrate into your home interior. Any material at hand is suitable: an unusual form of a plank, an old shelf, a wicker wire structure, unnecessary hooks or clothespins.

You need to show a little imagination and throw out unusual ideas into the material world. The old bookshelf will become elegant and stylish pieces of furniture in the hallway. The dried boards from the dacha or from the forest will perfectly fit into the interior as an antique highlight.

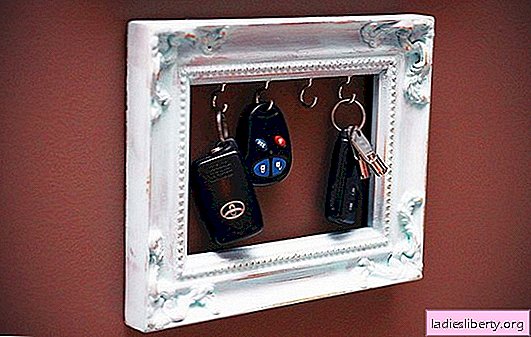
Do-it-yourself closed key holders
Closed key holders have doors. From the side, they look like small houses or birdhouses. Material for manufacturing can also be anything: wood, plastic, textiles.

For a wooden housekeeper, you need the following material at hand: wood or thick plywood, sandpaper, door fasteners, self-tapping screws, hooks, glue, colorless wood lacquer, acrylic paint for decoration (or a beautiful photo for the background).
Do-it-yourself process steps for making a housekeeper:
1. The sketch of the key keeper is being worked out. It is advisable to draw a diagram on paper. The diagram indicates the dimensions;
2. Parts are cut from wood or plywood. It is desirable to saw with a blade with the smallest cloves, which least damage the surface;
3. All parts are processed with sandpaper;
4. Now all the elements can be applied with a thin layer of varnish. It is recommended to repeat this procedure three times. In all cases, let the coating dry. Drying time depends on the brand of varnish, but most often it is enough to wait two hours until it dries completely;
5. If desired, the tree can be given the effect of scuffing and antiquity. For this, sandpaper is taken and the edges of the parts are slightly overwritten;
6. Assembling parts of a housekeeper with one's own hands in one design. Self-tapping screws are screwed from the inside out. The thickness of the walls of the key holder and the length of the screws, which should not eventually look out, are taken into account in advance;
7. Fastens a small door;
8. A lock or magnetic rails are installed (on both sides);
9. Screws for future keys. If desired, they can be installed on a decorative rectangular panel of plywood;
10. Decoration. Acrylic paints a picture on the outside of the door. Decoration without drawing is possible. It’s enough to stick any suitable photo.
The result was a beautiful and strong housekeeper. This can be proudly presented as a gift. For example, for a housewarming party.
DIY plaster housekeeper
The technique of gypsum molding, at first glance, it may seem difficult for a beginner. But with a detailed study of the issue, all doubts should disappear. Gypsum is incredibly obedient material. It is ideal for forming three-dimensional images with subsequent multi-colored painting.

To make a plaster key holder you will need the following material at hand: gypsum, acrylic paints, a plastic mold for molding, hooks, acrylic varnish.
Do-it-yourself process steps for making a housekeeper:
1. Gypsum is soluble in water. It is required to obtain a thick consistency similar to sour cream;
2. Fixing materials for the housekeeper are placed in the plastic form. They will be located on the side of the rear wall of the key holder and keep it suspended from the wall. Therefore, a reliable mount is selected;
3. The resulting liquid texture is poured into a plastic mold;
4. Do-it-yourself key hooks for the housekeeper are pressed into the plaster;
5. The gypsum form will begin to dry quickly, therefore, without delay, it is worth taking for the formation of a three-dimensional image. You can sculpt with your hands. It is possible in gloves;
6. After drying, the key holder is painted with paints using an art brush. If at this stage some part of the gypsum mold is no longer needed, it can be cut off and gently sanded with sandpaper;
7. Colorless varnish is applied to the dried paint. It is advisable to apply three layers. Each new layer should be applied to the well-dried previous one.
Unusual plaster key holder do it yourself.
Fancy do-it-yourself keeper

A cardboard key holder can look great in the hallway. To make it, you need thick cardboard, paper for decoupage or with any drawing you like, glue, scissors, a pencil, a ruler, a wooden stick as a key hook.

The back wall must be strong enough to take over and hold the weight of the key holder for a long time. It is recommended to make the wall with a double layer of cardboard.
The first place among the original key holders is given to the magnets key holder. It is so modern. Minimalism in design. Simplicity and reliability. You can make it from plywood, plastic or cardboard. It is enough to cut an interesting shape, insert a magnet, glue it.

You can decorate with a pattern, ribbons, pearls, phosphoric coating to glow in the dark. Children will appreciate such luminous housekeepers with their own hands. This can cause the habit of putting keys in their place.